
Understanding Pneumatic Tool Holder Mechanics for Blade Adjustment
Key Components of a Pneumatic Blade Holder System
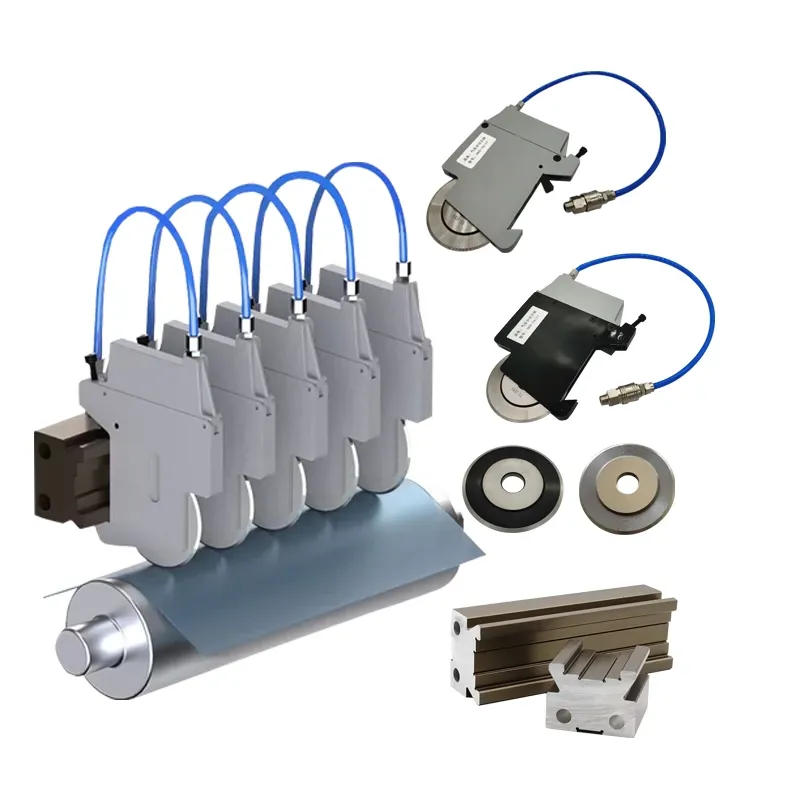
A pneumatic blade holder system comprises several essential components, including the blade clamp, collet, and release mechanism. Each plays a critical role in enabling precise blade adjustments. The blade clamp securely holds the blade in place during operation, preventing it from slipping. The collet is responsible for firmly gripping the blade shaft, ensuring alignment and stability even under high-speed conditions. The release mechanism allows for quick and efficient blade changes, enhancing operational efficiency.
The materials used in constructing these components significantly influence their durability and performance under high pressure. High-grade alloys are often used due to their strength and resistance to wear, which enhances the tool's longevity and ensures safety during operations. Typical operating pressures for pneumatic blade holders range from 80 to 120 psi, and their torque specifications are equally critical, ensuring the blade remains stable during high-intensity use. These engineering considerations are vital for maintaining the integrity and performance of pneumatic blade holders, underscoring their importance in precise and safe machining processes.
Role of Air Pressure in Tool Stability
Air pressure plays a vital role in stabilizing the blade within a pneumatic tool holder, significantly contributing to precision cutting by reducing vibrations. Studies indicate that maintaining optimal air pressure not only minimizes vibration but also enhances the tool's cutting accuracy. Conversely, improper air pressure can lead to blade misalignment and increased wear, which can diminish performance and pose safety risks. Inaccurate pressure settings can result in operational inefficiencies and potentially lead to blade or machinery damage.
To effectively measure and adjust air pressure, using tools such as manometers or pressure gauges is recommended. These instruments ensure the pressure is maintained within the specified range for optimal performance and safety. Regularly checking and calibrating these measurements can help avoid common issues related to pressure mismanagement, ultimately promoting more efficient and secure machining operations. Keeping air pressure within recommended limits is crucial for maintaining the operational integrity and effectiveness of pneumatic adjustment systems.
Pre-Adjustment Preparation and Safety Measures
Securing the Tool Holder Before Alignment
To ensure safety and precision during adjustments, securing the tool holder is paramount. You should start by thoroughly examining all fittings to make sure everything is intact and properly fastened. Crucially, the air supply must be switched off before making any adjustments to prevent unintended activations that could lead to serious injury. Personal protective equipment (PPE) such as gloves, safety goggles, and ear protection are also essential to shield against hazards like flying debris or accidental slips. By taking these measures, not only do we safeguard ourselves but also maintain the integrity of the tool holder for continuous optimal performance.
Inspecting the Blade Holder for Wear or Damage
Regular inspection of the blade holder is vital to maintain its efficiency and longevity. Begin with a thorough visual examination, identifying common indicators of wear such as nicks, rust, or deformations, which can compromise the holder's performance. A simple checklist can assist in this process, ensuring nothing is overlooked. Establishing a maintenance routine based on the equipment's usage can significantly enhance cutting accuracy and extend its service life. By addressing wear promptly, you can avoid potential mishaps during operations, ultimately preserving the tool's quality and ensuring consistent results. Regular upkeep not only protects the investment in your tools but also ensures a safer working environment.
Step-by-Step Blade Alignment Techniques
Positioning the Blade Tip with Cutting Line Precision
Achieving accurate blade alignment is crucial for optimal cutting performance. To start, it's essential to carefully measure the blade tip's position relative to the cutting line. This requires the use of specialized tools such as calipers or laser guides, which help in ensuring precision. By aligning the blade tip precisely with the cutting line, you can prevent deviations that might lead to material wastage or poor-quality cuts.
Operators can also rely on common reference points on the workpiece, like edges or pre-drawn guidelines, to assist in accurate positioning. These reference points act as guides that simplify the alignment process, reducing the likelihood of error. Emphasizing precision at this stage not only enhances cutting accuracy but also increases efficiency and reduces the likelihood of blade wear due to misalignment-related stress.
Using Alignment Indicators on the Blade Holder
Integrated alignment indicators are incredibly useful for facilitating precise blade adjustments. These indicators often come built into the blade holder, providing real-time feedback that streamlines the alignment process. Operators should become familiar with the best practices for using these features, such as following the manufacturer's guidelines and performing regular checks to ensure functionality.
Calibration of alignment indicators is essential for maintaining accuracy over time. Periodically recalibrating these devices ensures that they continue to contribute to improved cutting results. Calibration processes can often be linked to routine maintenance schedules, ensuring that the blade holder remains in top condition, thus enhancing overall blade holder accuracy and contributing to consistent cutting quality.
Fine-Tuning Blade Depth and Pressure Settings
Adjusting Fine-Tuning Screws for Even Pressure Distribution
The mechanics behind fine-tuning screws are crucial for optimizing cutting performance, as they allow for precise adjustments in pressure distribution across the blade holder. These screws ensure that the pressure is evenly distributed, which minimizes blade flex and enhances the quality of the cut. To achieve consistent pressure distribution, follow these steps:
1. Identify Pressure Points: Determine where the pressure is concentrated on the blade holder and adjust the screws to distribute it evenly.
2. Equalize Pressure: Begin with small adjustments, turning each screw in minor increments and checking the pressure distribution after each adjustment.
3. Test and Retest: Conduct a test cut to evaluate blade performance and make further adjustments as needed.
Fine-tuning adjustments help maintain the stability and efficiency of the blade, thus reducing the risk of uneven cuts and potential material wastage.
Calibrating Blade Depth for Material Thickness
Proper blade depth calibration is essential for cutting through different material thicknesses without compromising quality. Here are guidelines for adjusting blade depth effectively:
Assess Material Thickness: Begin by measuring the thickness of the material to determine the optimal depth setting.
Use a Depth Gauge: Employ a depth gauge or similar tool for precise measurement, ensuring the blade penetrates adequately without excessive force.
Industry-Specific Examples: In the packaging industry, thinner materials like film require shallow blade settings, whereas thicker cardboard might demand deeper penetration.
Adopting these measures allows for the smooth and accurate cutting of materials, enhancing productivity and reducing errors. Tools like depth gauges serve as valuable aides in establishing and maintaining the correct blade depth across various applications.
Verifying Blade Rotation and Stability
Checking for Wobble-Free Blade Rotation
Ensuring wobble-free blade rotation is essential for optimal cutting performance and tool longevity. Methods to test blade rotation include visual checks, where you inspect the blade while it's in operation to spot any visible wobbling. Additionally, using precision measuring devices like dial indicators can help detect minute irregularities in rotation. These methods are crucial because even slight wobbling can lead to uneven cuts and increased wear on the blade.
To troubleshoot wobble issues, I recommend examining the blade holder for any signs of damage or misalignment, which often cause instability. Tightening any loose screws and ensuring the blade is correctly seated can also help. If wobbling persists, replacing worn-out components might be necessary to maintain a stable, wobble-free operation.
Identifying Airflow-Related Resistance Issues
Airflow-related resistance is another factor that can affect blade stability during operation. Signs of such issues include uneven power distribution to the blade or fluctuating air pressure, which can lead to inconsistent cutting and increased mechanical strain. Observing these symptoms is critical in diagnosing resistance issues.
To mitigate airflow-related problems, I suggest regular maintenance checks, such as inspecting and cleaning air passages to ensure unobstructed airflow. Consistent monitoring of air pressure and power supply can prevent resistance from disrupting blade stability. These maintenance tips can significantly minimize issues, leading to smoother and more efficient cutting operations.
Testing and Calibration on Sample Materials
Conducting Test Cuts to Validate Alignment Accuracy
Conducting test cuts is essential to validate the alignment accuracy of your blades, ensuring optimal performance and precise results. To begin, select appropriate sample materials that mimic the properties of the actual materials you will be cutting. This ensures that the testing conditions closely resemble real-world scenarios. Establish clear criteria for success, such as measuring the cut depth, width, and uniformity, to evaluate performance accurately. Utilize tools like calipers and square gauges to gather precise measurements and ensure your equipment operates at optimal angles.
Incorporate data collection methods to assess alignment and cutting accuracy after adjustments. Record the outcomes of each test cut, noting any deviations from expected results. Use this data to fine-tune the blade alignment, making incremental adjustments as necessary. Consistent documentation serves as invaluable feedback, informing future adjustments and ensuring that your cutting processes remain efficient and accurate. This methodical approach to testing not only enhances alignment accuracy but also prolongs the longevity of your cutting equipment.
Troubleshooting Common Post-Adjustment Cutting Issues
Even with careful adjustments, common issues such as blade chatter or incomplete cuts can occur post-adjustment. Blade chatter, often resulting from misalignment or insufficient tension, can be rectified by recalibrating the blade holder and ensuring even distribution of tension across the blade. Incomplete cuts may result from dullness or incorrect blade height; addressing these involves sharpening or replacing blades and adjusting their position for seamless operation.
A comprehensive troubleshooting guide is invaluable for systematically isolating and addressing specific cutting problems. Start by identifying symptoms of issues, such as unusual sounds or uneven cuts. Follow a systematic process to pinpoint the root cause, using elimination techniques to rule out potential variables. For example, if cuts are incomplete, first check blade sharpness, then verify alignment, and finally, assess material compatibility. By approaching troubleshooting methodically, you can quickly restore cutting accuracy and minimize downtime. This ensures your operations maintain high standards of productivity and efficiency.
FAQ
What is a pneumatic blade holder?
A pneumatic blade holder is a tool used in machining and cutting processes that uses air pressure to secure and stabilize blades. It allows for accurate and efficient blade adjustments to enhance cutting precision.
What role does air pressure play in a pneumatic blade holder?
Air pressure is crucial in stabilizing the blade within a pneumatic tool holder. Proper air pressure reduces vibrations, enhances cutting accuracy, and prevents blade misalignment, thus maintaining operational efficiency and safety.
How can I ensure blade holder safety during adjustments?
To ensure safety during adjustments, confirm that all fittings are intact and fastened securely. Switch off the air supply, use personal protective equipment, and regularly inspect the blade holder for wear or damage.
What are alignment indicators on blade holders?
Alignment indicators are features built into blade holders that provide real-time feedback to help facilitate precise blade adjustments. They are essential for maintaining cutting accuracy and minimizing errors.